
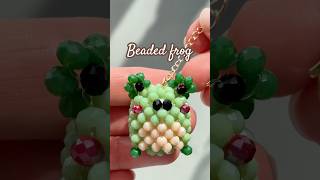
making a beaded frog bag charm because it's so squishy 🥹🐸
1 922
6.7
Ольга Лазарчук1.1 млн
Следующее
 10 дней – 43 6380:34
Популярные
 6 дней – 5 3480:54
 36 дней – 8 09112:31
Опубликовано 25 июня 2026, 18:00
In this step-by-step bead weaving tutorial, we are making a beaded frog bag charm because it's so squishy! 🥹🐸 This comprehensive 3D beadwork masterclass walks you through the entire process of creating your own adorable, pocket-sized frog companion from scratch. It’s the perfect aesthetic accessory to hang on your keys, backpack, or purse!
We will be using a classic right-angle weave variant around a circular base, blending a beautiful light green body with a cozy beige belly and cute little red cheeks. The absolute best part? I'm sharing the secret to stuffing this little guy to give it that incredibly satisfying, crunch-sounding, anti-stress squish! Grab your materials, clear your workspace, and let's create this cute little frog together!
🛠️ Materials Needed:
• Beads: High-quality 4mm rondelle beads in Main Green, Dark Green (for eyes/legs), Beige (for the belly), 4 pieces of Black, and 2 pieces of Red.
• Line: Clear, transparent fishing line — diameter 0.25 mm (0.01 inches).
• Line Length: Cut approximately 145 cm (57 inches).
• Stuffing: A tiny piece of a standard clear plastic bag to create the anti-stress squish effect.
• Tools & Findings: Keychain or bag charm hardware, jewelry pliers, and thread cutters.
⏳ Timestamps:
00:00 - Intro & Squishy Beaded Frog Reveal (ASMR sound!)
00:50 - Base Ring & Row 1: Crafting the Cute Frog Eyes
05:36 - Row 2: Weaving the Main Face & Red Cheeks
08:08 - Row 3: Building the Beige Belly Panel
10:12 - Row 4: Expanding the 3D Body Shape
12:01 - Row 5: Adding the Front Feet & Closing the Base
💡 Pro-Tips for a Perfect Beaded Frog:
Stuffing is Key: Don't overstuff or understuff! A small, loosely crumpled piece of a plastic bag gives it the loudest, most satisfying crunch sound while letting the beads retain their perfect 3D shape.
Mind the Tension: Make sure your tension is firm but flexible during Row 1 and Row 2 so the eyes don't droop and the black beads sit neatly nestled inside the dark green clusters.
Secure Your Feet: When weaving the front feet in the final row, ensure you pull the line completely flush against the base row so the legs naturally point forward instead of twisting sideways.
✨ LET'S BE FRIENDS! ✨
For daily beadwork inspiration, behind-the-scenes studio vlogs, and aesthetic jewelry reveals, follow me here:
📸 Instagram: instagram.com/khelga.ua?igsh=Z...
🎀 TikTok: tiktok.com/@its_khelga?_r=1&am...
#beadedfrog #bagcharm #beadingtutorial
We will be using a classic right-angle weave variant around a circular base, blending a beautiful light green body with a cozy beige belly and cute little red cheeks. The absolute best part? I'm sharing the secret to stuffing this little guy to give it that incredibly satisfying, crunch-sounding, anti-stress squish! Grab your materials, clear your workspace, and let's create this cute little frog together!
🛠️ Materials Needed:
• Beads: High-quality 4mm rondelle beads in Main Green, Dark Green (for eyes/legs), Beige (for the belly), 4 pieces of Black, and 2 pieces of Red.
• Line: Clear, transparent fishing line — diameter 0.25 mm (0.01 inches).
• Line Length: Cut approximately 145 cm (57 inches).
• Stuffing: A tiny piece of a standard clear plastic bag to create the anti-stress squish effect.
• Tools & Findings: Keychain or bag charm hardware, jewelry pliers, and thread cutters.
⏳ Timestamps:
00:00 - Intro & Squishy Beaded Frog Reveal (ASMR sound!)
00:50 - Base Ring & Row 1: Crafting the Cute Frog Eyes
05:36 - Row 2: Weaving the Main Face & Red Cheeks
08:08 - Row 3: Building the Beige Belly Panel
10:12 - Row 4: Expanding the 3D Body Shape
12:01 - Row 5: Adding the Front Feet & Closing the Base
💡 Pro-Tips for a Perfect Beaded Frog:
Stuffing is Key: Don't overstuff or understuff! A small, loosely crumpled piece of a plastic bag gives it the loudest, most satisfying crunch sound while letting the beads retain their perfect 3D shape.
Mind the Tension: Make sure your tension is firm but flexible during Row 1 and Row 2 so the eyes don't droop and the black beads sit neatly nestled inside the dark green clusters.
Secure Your Feet: When weaving the front feet in the final row, ensure you pull the line completely flush against the base row so the legs naturally point forward instead of twisting sideways.
✨ LET'S BE FRIENDS! ✨
For daily beadwork inspiration, behind-the-scenes studio vlogs, and aesthetic jewelry reveals, follow me here:
📸 Instagram: instagram.com/khelga.ua?igsh=Z...
🎀 TikTok: tiktok.com/@its_khelga?_r=1&am...
#beadedfrog #bagcharm #beadingtutorial
Свежие видео

 12 дней – 2980:28
 15 дней – 1 7552:30:00

 29 дней – 1 3210:18
 32 дня – 2 58511:30
 37 дней – 40 59321:25
Случайные видео

 72 дня – 10 5180:18
 157 дней – 1 6601:51:06
 358 дней – 32 0890:04
 22.12.24 – 34 96539:00
 20.11.23 – 1 749 1740:40
 15.07.14 – 11 68313:44
 3 дня – 3369:02
 11 дней – 68 21724:11
 21 день – 5 6380:12
 22 дня – 6 40616:54
 23 дня – 2 5438:40
 28 дней – 4372:03
 30 дней – 4 5101:51:06
 7 дней – 4 8090:20
 12 дней – 19 0696:57